
Tutorial Details
- Program: Adobe Illustrator CS5
- Difficulty: Intermediate
- Estimated Completion Time: 1 hour
Download Source Files
- Source files for this tutorial are available to Premium members.
Get a Premium Membership
Final Product What You'll Be Creating
In this tutorial I’m going to show you how to create a feather art brush. You’ll then learn how to use it to create a set of angel wings, which can be added to your illustrations.
Introduction
It’s a common element in fantasy style art to have a set of wings. Ranging from bird like wings to epic angel wings, they can communicate a sense of freedom. Let’s learn to create a feather art brush, then use it to create a set of angel wings, which would work great in your next fantasy, vector illustration.
Step 1
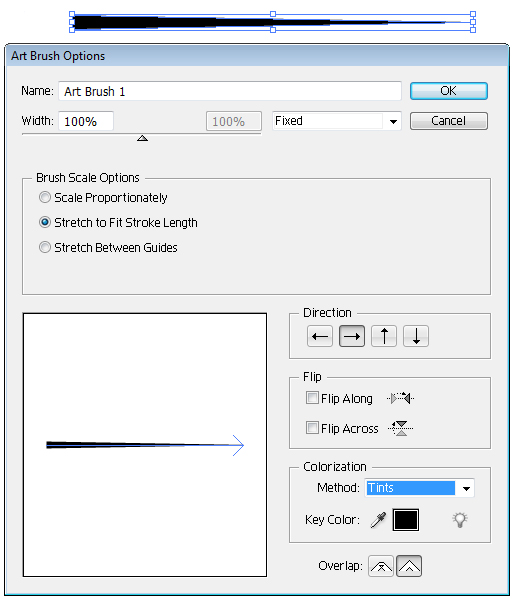
Create a new Art Brush by creating a slim black triangle with the Pen Tool (P), and then drag and dropping it into your Brush Palette. Select New Art Brush, change the Colorization Method to Tints, and click on OK.
Step 2
Using the Free Transform Tool (E) rotate the triangle 90 degrees so the flat base is at the bottom. Change the fill color to a medium gray (C=0, M=0, Y=0, K=30).
Copy (Command + C) and Paste in Front (Command + F) the triangle. Using the Direct Selection Tool (A), move one of the points in the base of the triangle and change the fill color to a light gray (C=0, M=0, Y=0, K=10).
Repeat this process while creating a darker triangle on the other side of the shape with a darker gray (C=0, M=0, Y=0, K=60). Once you have the three shapes, Select All (Command + A) and Group them (Command + G).

Step 3
The next step you’re going to need to Draw Behind. You can either click on the circled button below on the toolbar or hit Shift + D on your keyboard. While selected any future strokes and shapes will be drawn behind the previously drawn object.
Using the Paintbrush Tool (B), select your triangle brush and set it to 0.25pt stroke weight and set the stroke color to medium gray (C=0, M=0, Y=0, K=30).
Imagine the three tone triangle as the spine to the feather. To help make it easier to draw the strands of the feather, draw the bottom of the feather just above the bottom of the spine. Repeat the same strands towards the top, however not placing them at the very top. Then to assist further, draw some strands in the middle.

Step 4
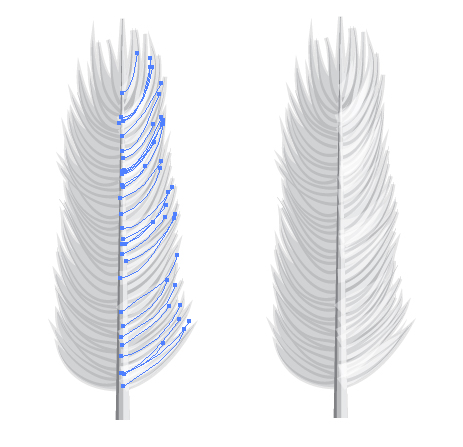
Using the same stroke settings, draw in further strands between your guides. Don’t worry if they are not completely uniform as it will look more organic if there are some strands which are close to each other or even cross over.
Step 5
Back to the Pen Tool (P), change the stroke color to null and the fill color to light gray (C=0, M=0, Y=0, K=10). Starting from the bottom strands of the feather, draw around the strands, connecting as many as you can to create a background to the strands.

Step 6
While the background to the feather shape is selected, go into the Appearance panel. Set the stroke as 2pt and align to outside of the shape. Change the Opacity to 10% and the Blending Mode to Multiply.

Step 7
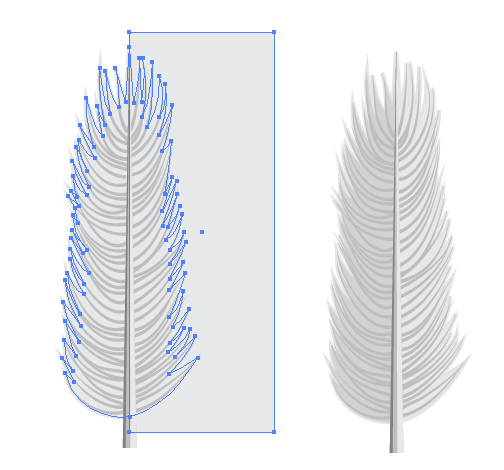
Copy (Command + C) and Paste in Front (Command + F) the feather shape and remove the stroke appearance from it. Using the Rectangle Tool (M), cover half of the feather where your highlight line on the stem is at. Drag the shape above the copied feather shape.
Minus Front using the Pathfinder options, while the rectangle and feather shape are selected. Then change the fill color of this portion to a dark gray other than what you had, but not too dark that you can’t see the strands you previously drew (C=0, M=0, Y=0, K=20).
Step 8
Change the drawing mode to Draw Normal by selecting the button on the toolbar or hitting Shift + D on your keyboard. This will mean any new strokes will be drawn on top of each other.
Set the Paintbrush Tool (B) with your triangle brush to: stroke weight 1pt, stroke color of a light gray (C=0, M=0, Y=0, K=20). Now change the Blending Mode to Screen and the Opacity to 50%. Draw strokes on the lighter side of the feather. Double over some of the strokes to give more highlights and subtle variation in the tone.
Step 9
Change the Blending Mode now to Multiply and Opacity to 35%. Draw strands on the darker side of the feather as before.

Step 10
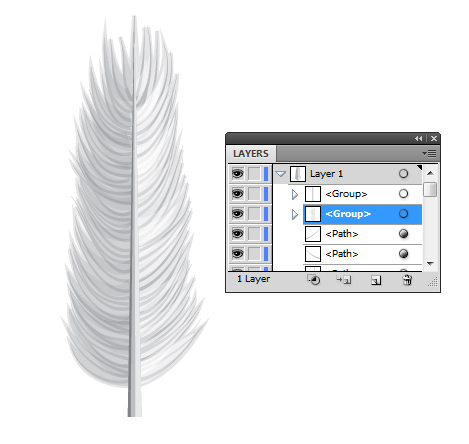
Select one of the strands you’ve just created and go to Select > Same > Stroke Weight and then Group the strands (Command + G).
Drag the newly created group below the group you made for the spine of the feather.
Step 11
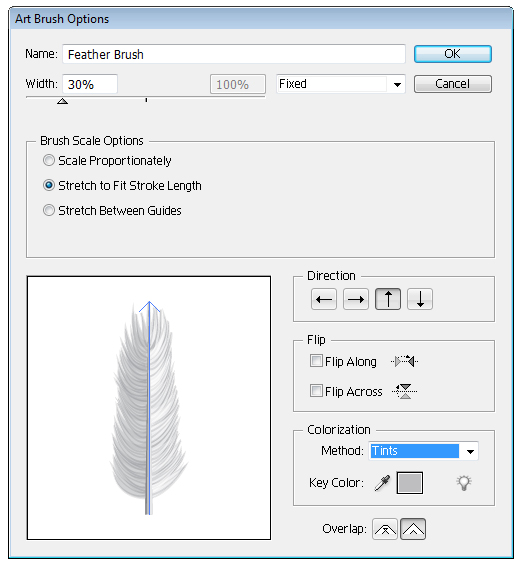
Select all (Command + A) and then Group (Command + G) all the elements together. Drag and drop the group into the Brush palette and select New Art Brush.
Due to the size of the brush created, I’ve changed mine to 30% of the original size. Change the direction of the brush so the start of your stroke is the base of the feather and the tip is the last point of your stroke. Now change the Colorization Method to Tints and click OK.
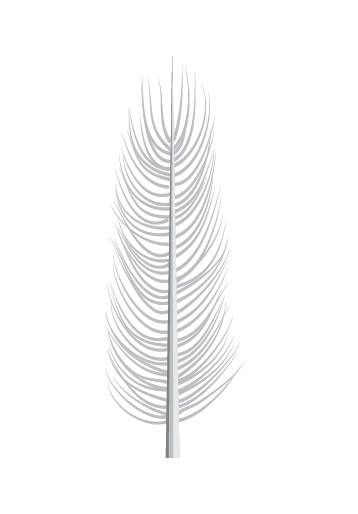
Feather Brush Conclusion
Your brush is now complete and can be altered to give tints of color and to increase the contrast of the brush depending on how dark your colors are.

Creating a Set of Wings
Now that you’ve created your detailed feather art brush, you can use it to construct a variety of stylized wings. I’m going to show you simple way to create a set of stunning wings.
Step 1
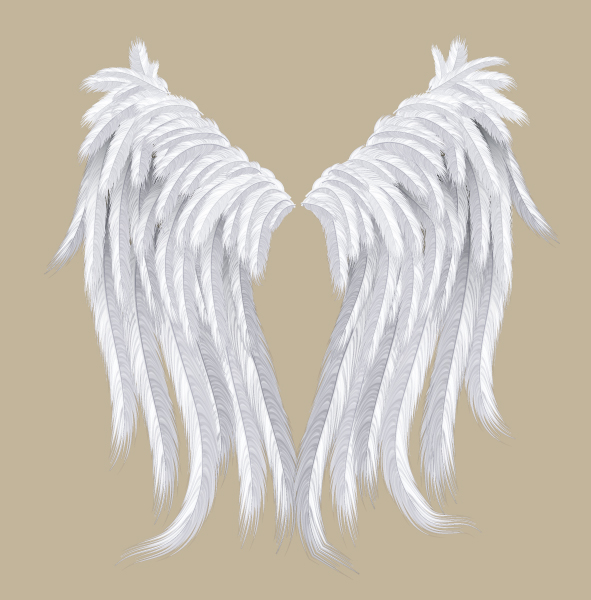
The general rule with constructing wings is to work in layers of feathers. The feathers on the top of the wing will be finer and shorter… the lower layers will be wider and longer. So working on this theory I’m going to construct this set of wings shown below.
For each of the layers of feathers I have Grouped them (Command + G) to make it easier to work with later on.

I’m using the stroke color for my feathers of a gray with a hint of blue (C=55, M=45, Y=30, K=0).
Tip: Place a color behind your wings so you can make sure you have no gaps between the top parts of the wing.

Step 2
To give each layer of feathers more definition, add a transparent linear gradient black to black set to Multiply under each one.

Step 3
Lock the gradients, then using the Direct Selection Tool (A), click on some random feathers and alter their color subtly. I recommend lightening the feathers towards the top slightly, therefore the lower feathers would be altered to look a little darker.

Step 4
Unlock the gradients and then Select All (Command + A). Then Copy (Command + C) and Paste (Command + V).
Now reflect the wings by going to Object > Transform > Reflect, select Vertical, and click on OK.

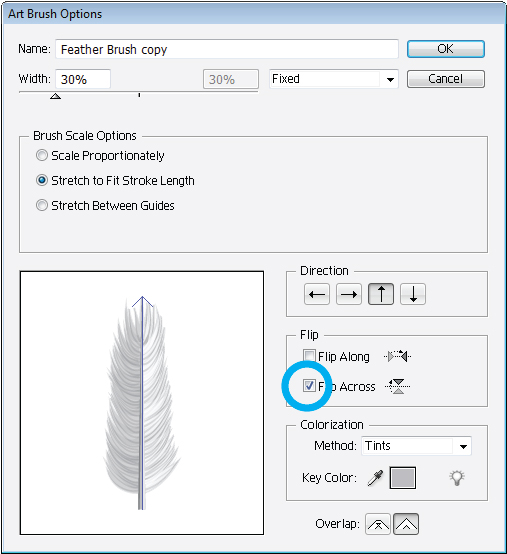
Step 5
In the Brush palette, drag and drop the feather brush onto the New Brush icon. This will duplicate the brush. Then double-click on your copied feather, tick the box Flip Across, and then click on OK.
Step 6
Select the groups from the mirrored wing and apply the copied feather brush. Now with the Direct Selection Tool (A), select individual feathers and alter their placement, length, and angle so they don’t look mirrored.

Conclusion
Thanks to the time spent on creating your feather brush, you can create a variety of wings in no time at all. If you’d like to learn more about the structure of a wing, I highly recommend this Wing Tutorial via Fatal-Mantis85. The final wings are shown below.
댓글 없음:
댓글 쓰기