
Download Source Files
- Source files for this tutorial are available to Premium members.
Get a Premium Membership
The world of animation can seem really intimidating – between AfterEffects, Flash and everything else, there’s so much to learn. And who has time? Never fear – you can create simple Flash animations without ever leaving the familiar confines of Illustrator, and without any knowledge of Flash. Here are two easy ways to get things moving.
Final Image Preview
Below are two final SWF animations we will be working creating. Want access to the full Vector Source files and downloadable copies of every tutorial, including this one? Join Vector Plus for just 9$ a month.
Tutorial Details
- Program: Adobe Illustrator CS4
- Difficulty: Intermediate
- Estimated Completion Time: 45 minutes
Video Tutorial
I’ve created this video tutorial to compliment this text + image tutorial.
Method I: Blend and Morph
For this type of animation, in which one shape transforms into another (and another and another, if you wish), we’ll use the Blend Tool to make the in-between shapes, then release each shape to its own layer, then export these as a sequence for the Flash file.
Step 1
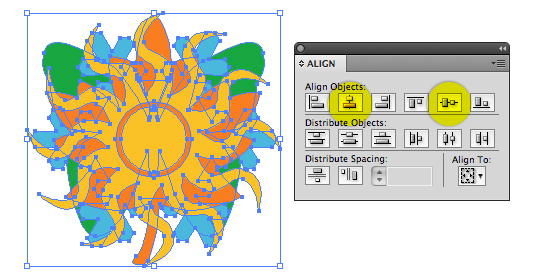
Since this animation will be used on the Web, start with a new RGB document. Here I have four simple icons, representing the four seasons. Select all the shapes, then center-align them horizontally and vertically, using the Align panel (or the Control panel). Make sure that each shape is on the same layer.

Step 2
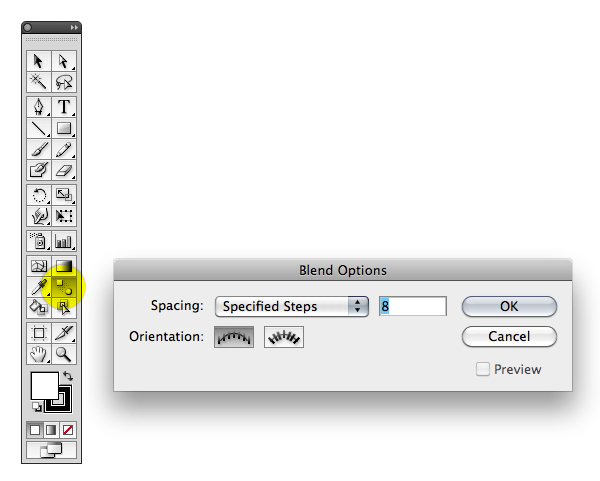
Double-click the Blend Tool in the tool palette to bring up its options. Choose Specified Steps in the Spacing pull-down menu, and type 8. That will give us a smooth transition between the shapes, but won’t make too many layers.
Step 3
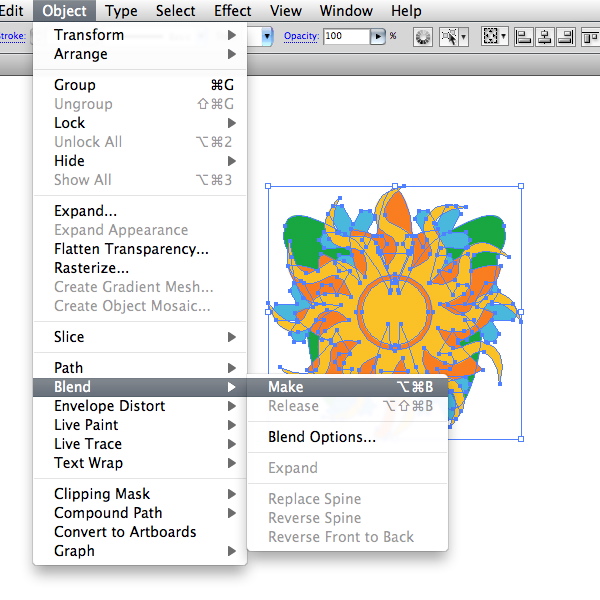
With all the shapes selected, go to Object > Blend > Make.
Step 4
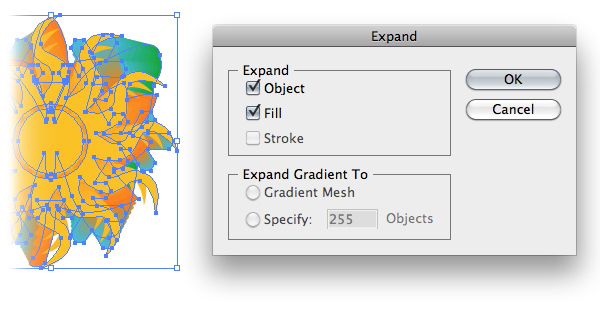
With the blended shapes still selected, go to Object > Expand. This will separate the blend into individual shapes. For this effect to work, the individual shapes must be disassociated from one another, so go to Object > Ungroup.
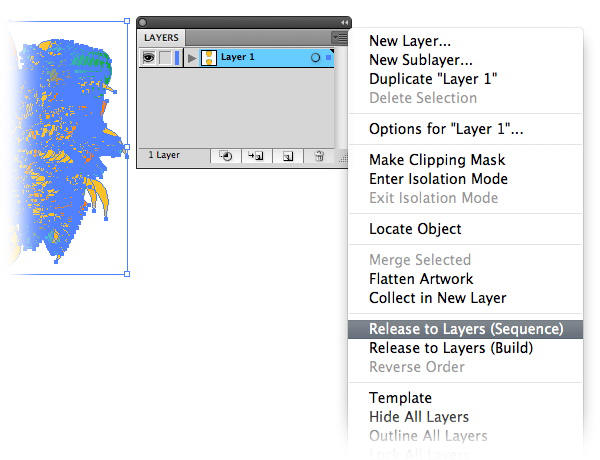
Step 5
The ungrouped shapes should still be all on one layer. In the Layers panel, make sure the layer is highlighted, click the flyout menu, and choose Release to Layers (Sequence). You’ll notice that each shape is now on its own layer, and each layer has a different color. If you don’t see this, go back and make sure you have ungrouped the expanded blend.
Step 6
Go to File > Export and choose Flash (SWF) as the file format (NOTE: Depending on the version of Illustrator and/or the version of Flash you have installed on your computer, the file format might be called Macromedia Flash). Choose AI Layers to SWF Frames as the Export method.
Now click the Advanced button to bring up more options. Choose Lossless as the Image Format. Click Looping, so that your animation will play over and over again. The default settings are fine for the rest of the SWF Options dialog box, but you may want to experiment with them in future projects.
Step 7
To see your animation in action, do one of two things: Click the Web Preview button in the SWF Options dialog box, which will launch your default Web browser and play the animation. Or, save the SWF file, then drag it onto a blank browser window to play it.
Options
1. When working with a Blend to create an animation, you may have noticed the Animate Blends checkbox in the Advanced SWF Options dialog. This does what it says: it uses the blend for the animation and separates each expanded shape in the process. So you really don’t have to do Steps 4 and 5, but it helps to understand how Illustrator creates the animation.
2. If you prefer, the Illustrator file can be exported to Photoshop, then opened in ImageReady to create animations there. Follow Steps 1 through 5 above, then export as a Photoshop (PSD) file. The key here is to check both Write Layers and Maximum Editability in the Export Options dialog box. When you open the file in Photoshop, you’ll see each layer (in this case, all 29 of them) is preserved. You can then jump to ImageReady and edit the animation frame by frame.

Now that you understand the basic concept, you can experiment will all sorts of blends and morphs. For some really trippy animations, try using 3D objects or gradient-filled shapes.
Method II: The Appearance Panel
Step 1
Again, start with an RGB file. I’m using this simple zombie silhouette, with a fill of black and a stroke of none. I’m going to add a series of strokes to the outside of the shape, so that when animated, the strokes will radiate out from the shape.
Select the shape, go to the Appearance panel and choose Add New Stroke from the flyout menu. In CS4, all the modifications to this new stroke can be made directly in the Appearance panel. Going from left to right, first click the word Stroke to bring up the Stroke options. Click the third icon next to Align Stroke to align it to the outside of the shape. Next, click the color swatch to apply the color (I started with black), and then finally choose the stroke weight in the third field.


Step 2
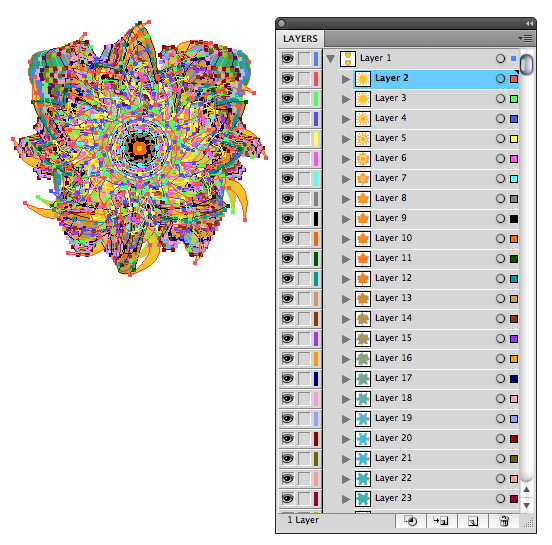
To add the remaining strokes, you could repeat step one over and over, changing the options, color and weight each time. But to save a bit of time, simply click the Duplicate Select Item icon at the bottom of the stroke panel to make a copy of the stroke. Now choose the copy (it should be the one UNDER the original), and change its color to a very dark blue (or whatever you want), and the weight to 2 points.
Repeat this procedure several times, adding a lighter and thicker stroke each time. The end result should look something like the image below. You’ll see each additional stroke in the Appearance panel.

Step 3
Go to Object > Expand Appearance. This will expand and separate the strokes.

Step 4
Ungroup the expanded strokes, and just like you did in Part I, select the layer in the Layers panel and choose Release to Layers (Sequence) from the flyout menu (for this method, you really have to do this step).

Step 5
Export the file to Flash, as in Step 6 above. For this image, I am going to change the background color to black, but the other settings remain the same.

Step 6
To see your animation in action, do one of two things: Click the Web Preview button in the SWF Options dialog box, which will launch your default Web browser and play the animation. Or, save the SWF file, then drag it onto a blank browser window to play it.
Conclusion
As before, preview the file in your Web browser. Try dragging the browser window bigger and smaller. Since this is a vector-based file, the quality is great at any size. Happy animating!
댓글 없음:
댓글 쓰기