Create a Happy Sun Character
Tutorials | October 15th, 2009

Well, it’s Blog Action Day 2009 today and the topic is Climate Change. So I decided to create a fun sun character tutorial. This intermediate tutorial is great for logos, children illustrations, and other projects relating to climate change. Moreover, you can easily apply this tutorial to other illustrations, logos, and projects!
Blog Action Day Day 2009: Climate Change
Climate change is an important issue that affects everyone on this planet. If you are reading this, you are probably a designer, illustrator, or involved in these industries in some way. Being part of these industries, we have a unique responsibility to visually communicate issues such as climate change. That makes it fun an easy to spread the word about climate change through artwork like in this tutorial. Even if you are not part of the design industry, you can learn more about climate change form the Blog Action Day site.
Final Image
Below is the final illustration we will be working towards.

Tutorial Details
- Program : Adobe Illustrator CS4 (tutorial can be completed with other version of Illustrator)
- Difficulty: Intermediate
- Estimated Completion Time: 30 minutes – 1 hour
Step 1
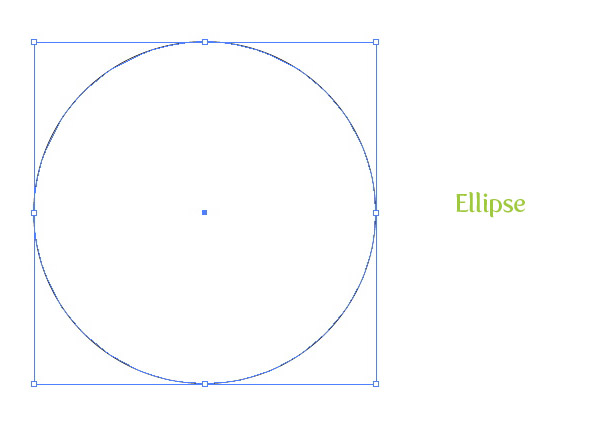
Create a new document and with the Ellipse tool (L), create an ellipse.
Step 2
Fill the ellipse with a radial gradient from the Gradient panel. In the Gradient panel, change the first color stop in the gradient to a light orange color and change the second color stop to a orange color. Next, from the Gradient panel, select your first light orange color stop and change the Location to 43. Select the Middlepoint on the Gradient Slider and change the location to 60. With the Gradient tool (G) move the center of the gradient slightly up and to the right.

Step 3
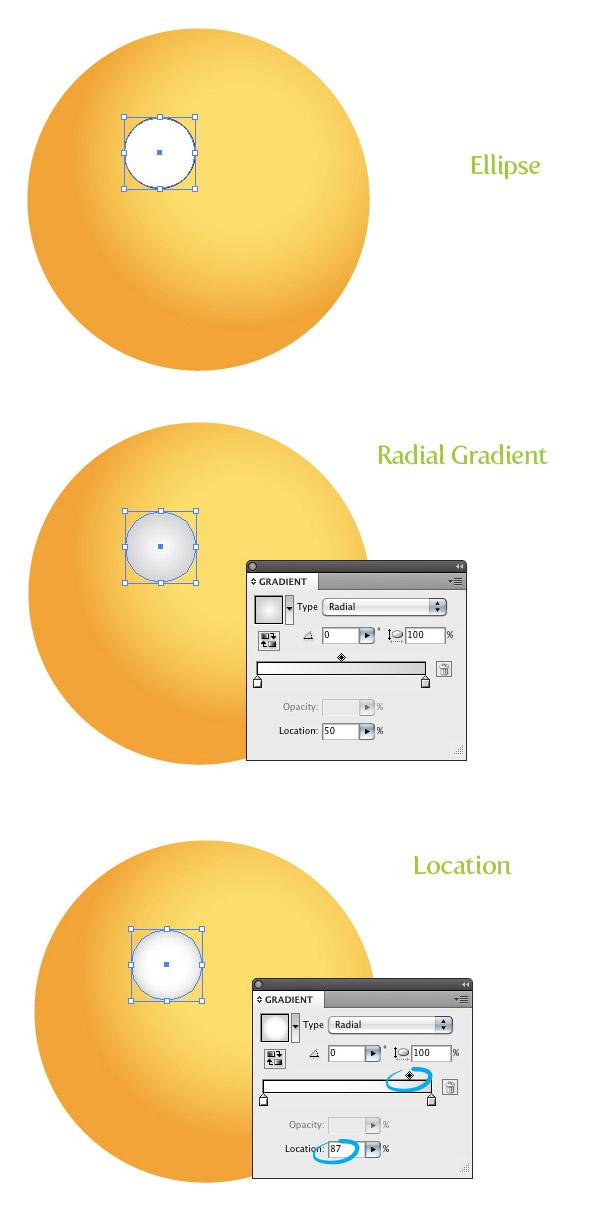
Create a new ellipse and fill it with a radial gradient. Make the first color stop in the gradient white and the second color stop a light gray color. Change the location of the gradient’s Middlepoint to 87.
Step 4
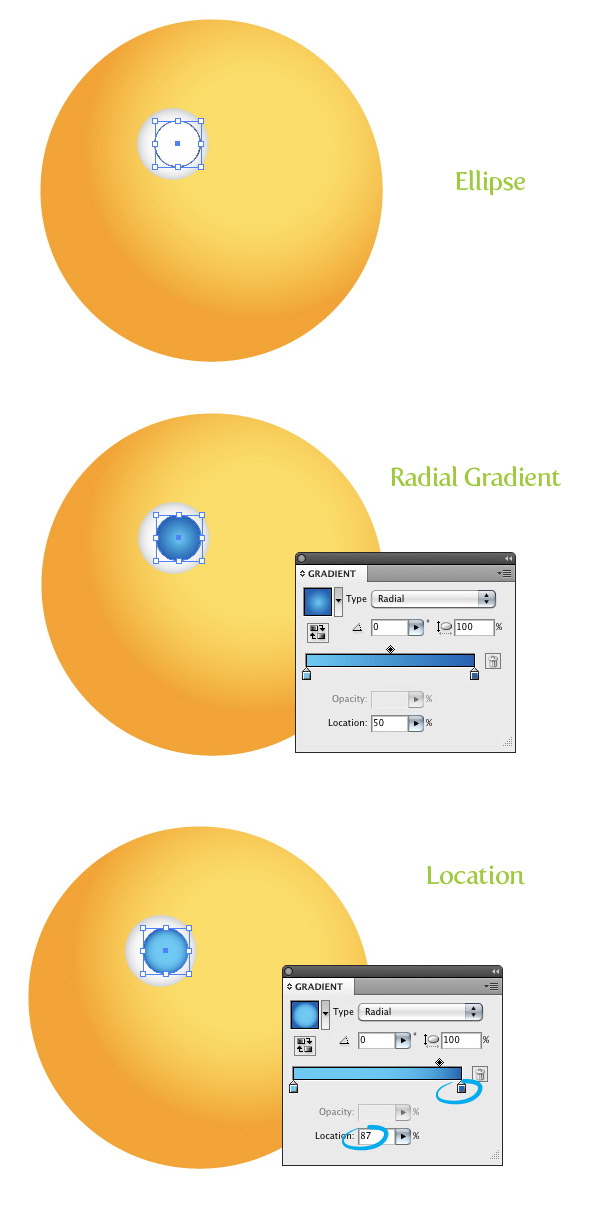
Create a new smaller ellipse in the center and to the right of the previous ellipse. Fill the ellipse with a radial gradient with the first color stop a light cyan color and the second color stop a dark cyan color. Change the location of the gradient’s Middlepoint to 87.
Step 5
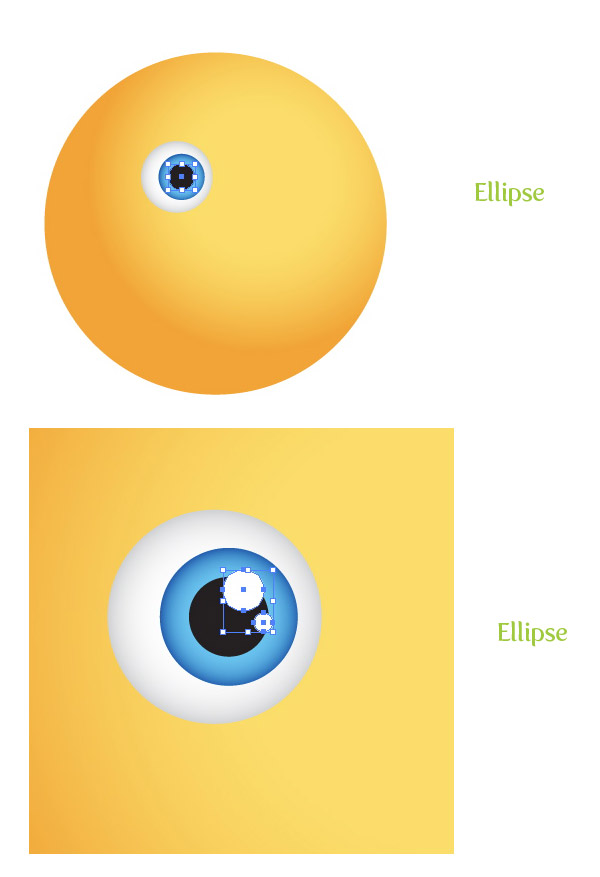
Create another ellipse in the center of the previous ellipse and fill it with black. Next, create two other smaller white ellipses and place them over the black ellipse. Now we have an eye!
Step 6
Select the white eye ellipse, Copy (Command + C), and Paste in Back (Command + B). With the copy still selected, move it up slightly. Change the fill of the ellipse to a dark orange color. Select the white ellipse again, Copy (Command + C), and Paste in Back (Command + B). This time, move the copy down slightly and change the color to a light yellow color.

Step 7
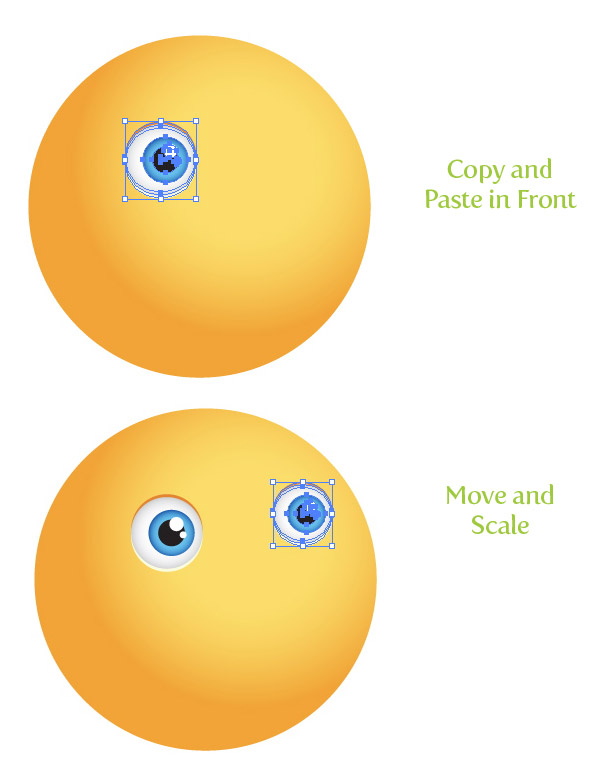
Select all the eye shapes, Copy (Command + C), and Paste in Front (Command + F). With the copies selected, move them to the right of the main ellipse shape and scale down slightly with the Selection tool (V).
Step 8
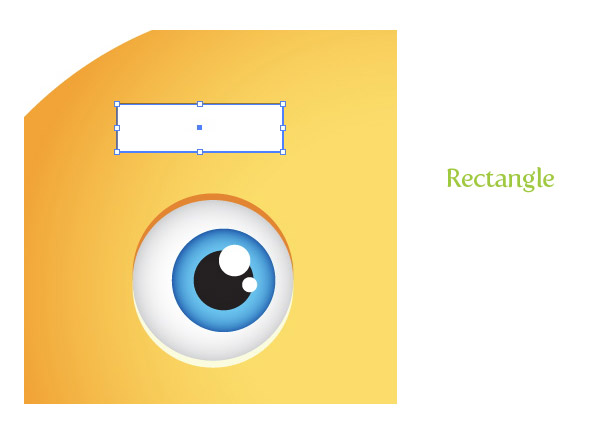
With the Rectangle tool (M) create an rectangle about the width of the eye shape and about a fourth of it’s height.
Step 9
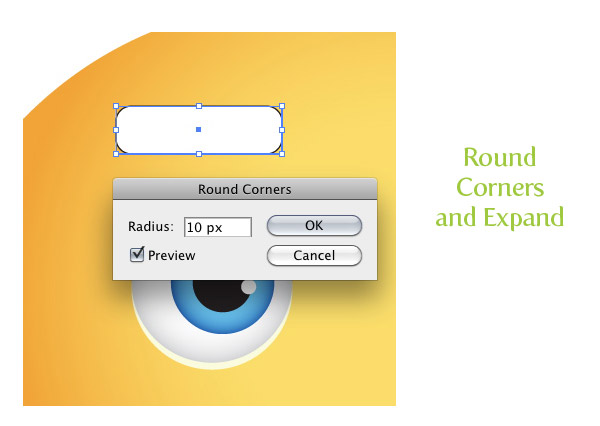
Go Effects > Stylize > Round Corners and in the Round Corners dialog, change the radius to 10 px. The radius might change depending on dimension of your artwork. Just play around until you get something similar to the preview image below. Next, go Object > Expand Appearance.
Step 10
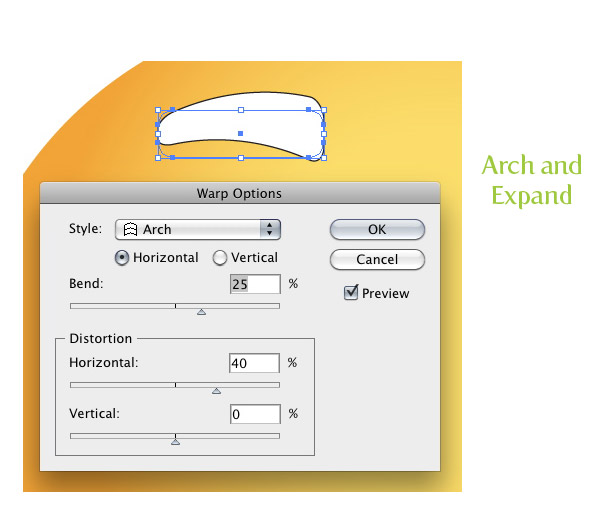
Go Effects > Warp > Arch. With the Warp Options dialog open, make sure the Horizontal radial button in selected, change the Bend percentage to 25, and change the Horizontal Distortion to 40. Next, go Object > Expand Appearance.
Step 11
Change the fill of the warped shape to a linear gradient. Make the first color stop in the gradient a red-brown color and the second color stop a dark red-brown color. With the Gradient tool (G) adjust the gradient so the darker part of the gradient is at the bottom of the shape.
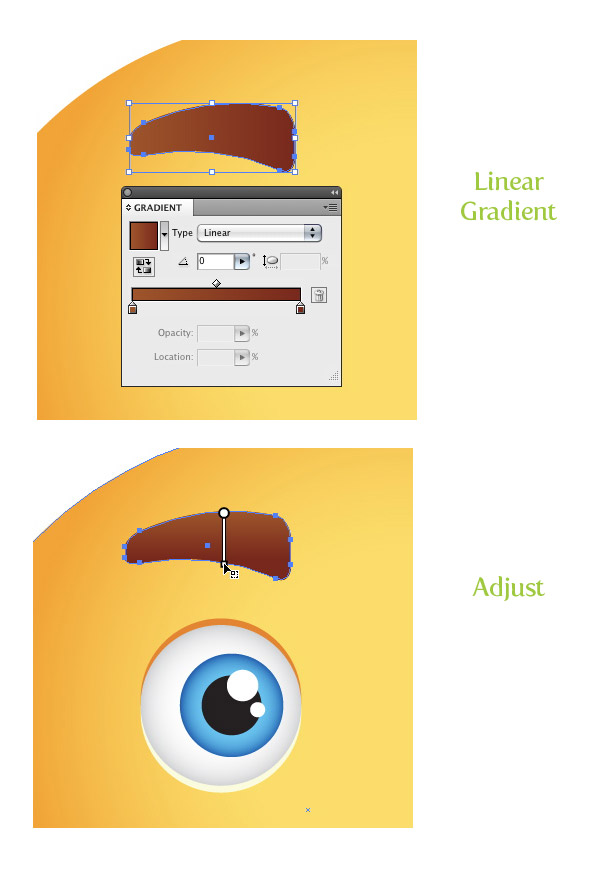
Step 12
Copy (Command + C) the eyebrow shape and Paste in Back (Command + B). With the copy selected, move it down and to the left slightly. Change the fill of the copy to a dark orange.
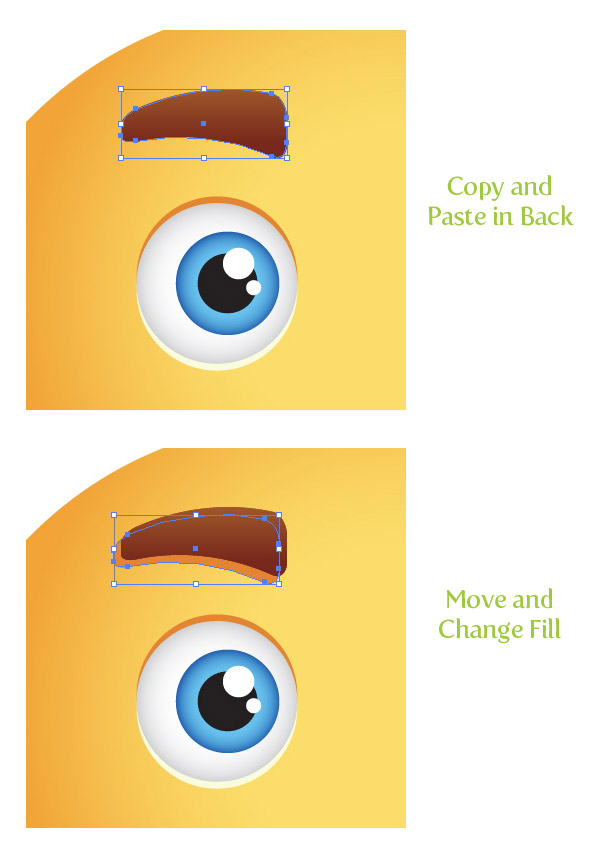
Step 13
With both eyebrow shapes selected, rotate them to the left slightly with the Selection tool (V). Copy (Command + C) the eyebrow shapes and Paste in Front (Command + F). With the copy selected, go Object > Transform > Reflect. In the reflect dialog, select the Vertical radial button and press OK. Next, move the copies to the other side of the face above the other eye. Select the dark orange shadow of the copies and move it the left side of the eyebrow.

Step 14
Create an ellipse about the size of one of the eyes and place it in-between the eyes towards the bottom.
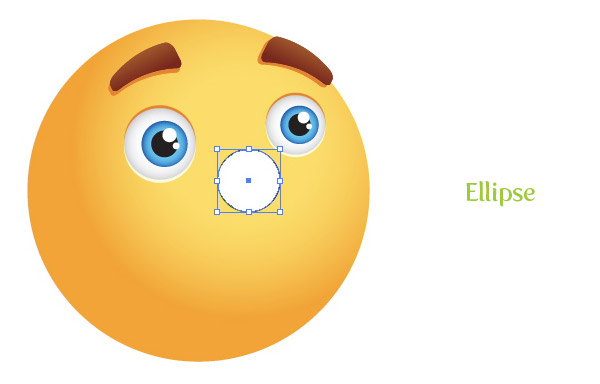
Step 15
Fill the new ellipse with a radial gradient. For this gradient we are going to add one more color stop, making a total of three color stops in the gradient. To do this, click in the middle of the Gradient Slider in the Gradient panel. Next, change the first color stop to a lighter orange color than your original light orange from the main sun shape, change the middle color stop to the same orange color as the main sun body shape, and change the last color stop to the same light orange as the main sun shape. Change the first Middlepoint of the first two color stop to 65. Finally, with the Gradient tool (G), scale the gradient so the center of the gradient is in the top right corner of the ellipse.

Step 16
Copy (Command + C) the nose shape and Paste in Back (Command + B). With the Direct Selection tool (A) grab the bottom anchor point and drag in down and to the left, creating a shadow.
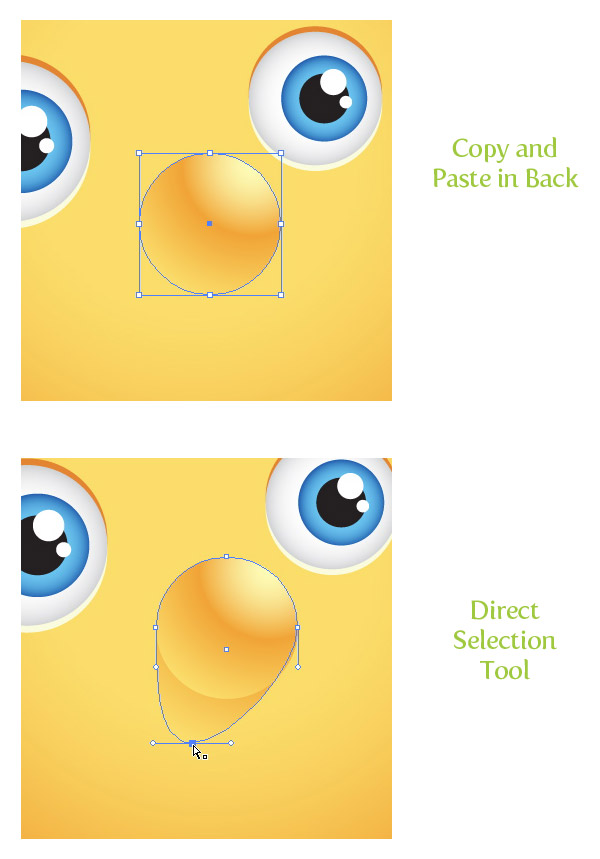
Step 17
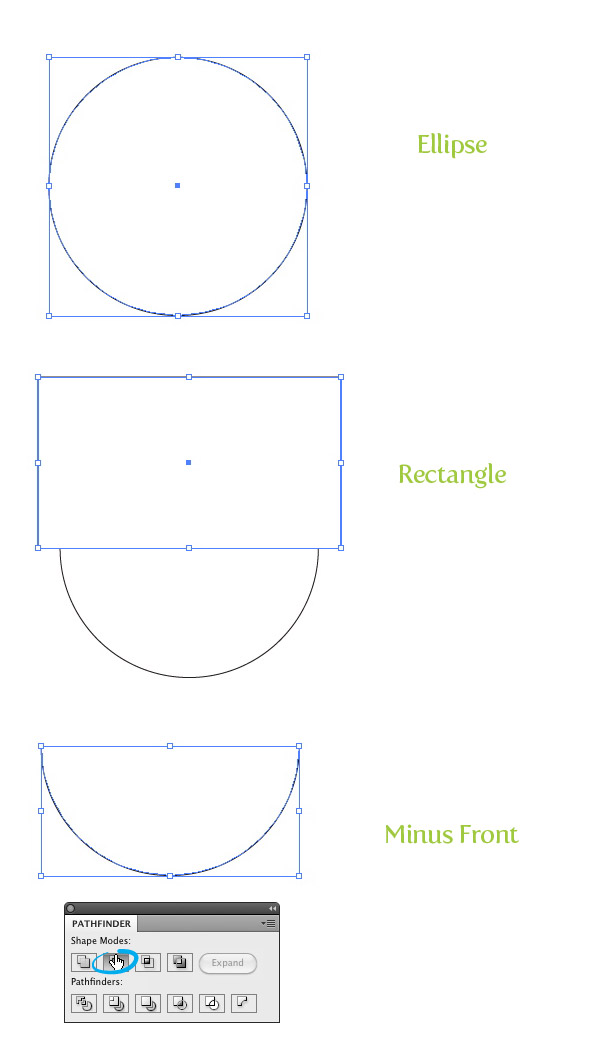
Create an ellipse about half the size of the main sun shape. Draw a rectangle covering the top half of the ellipse. Select both shapes and press the Minus Front button in the Pathfinder panel.
Step 18
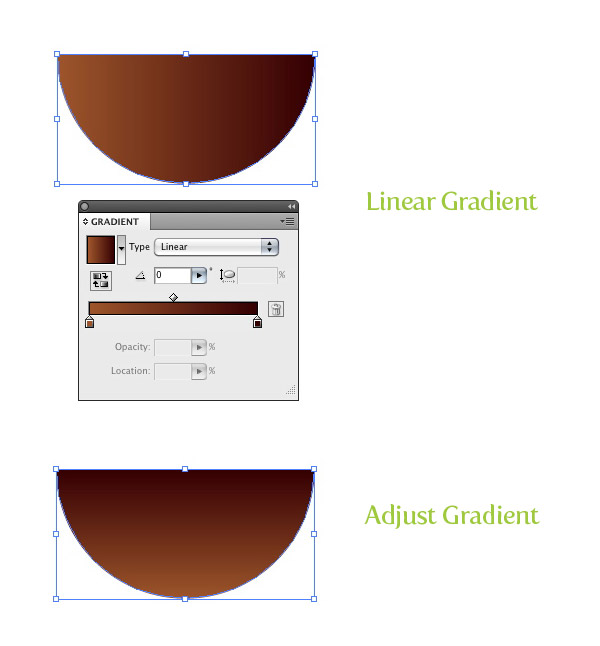
Fill the new mouth shape with a linear gradient with the first color stop a red-brown color and the second color stop a darker red-brown color. With the Gradient tool (G) adjust the gradient bottom up so the darker part of the gradient is at the top of the mouth.
Step 19
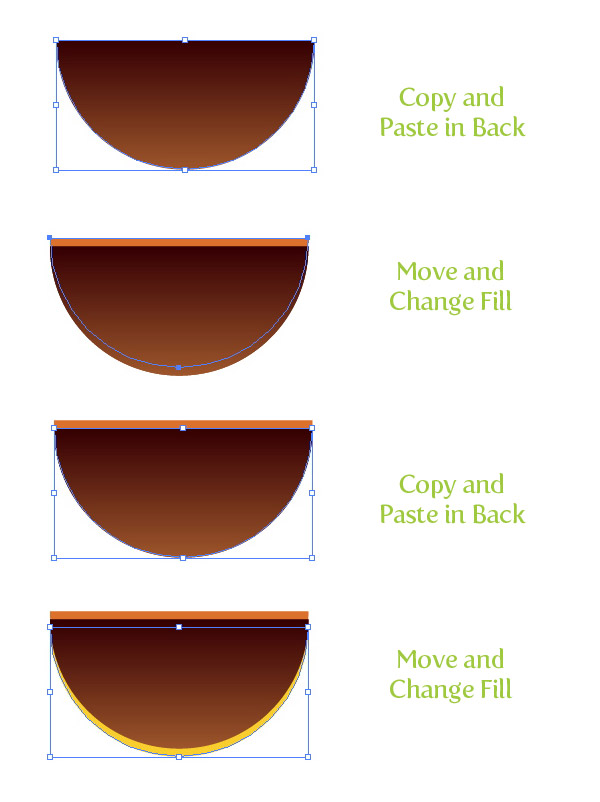
Copy (Command + C) the mouth shape and Paste in Back (Command + B). Move the copy up slightly and change the color to your dark orange color. Copy (Command + C) the mouth shape and Paste in Back (Command + B) again. This time, move the shape down and change the fill to your light orange color.
Step 20
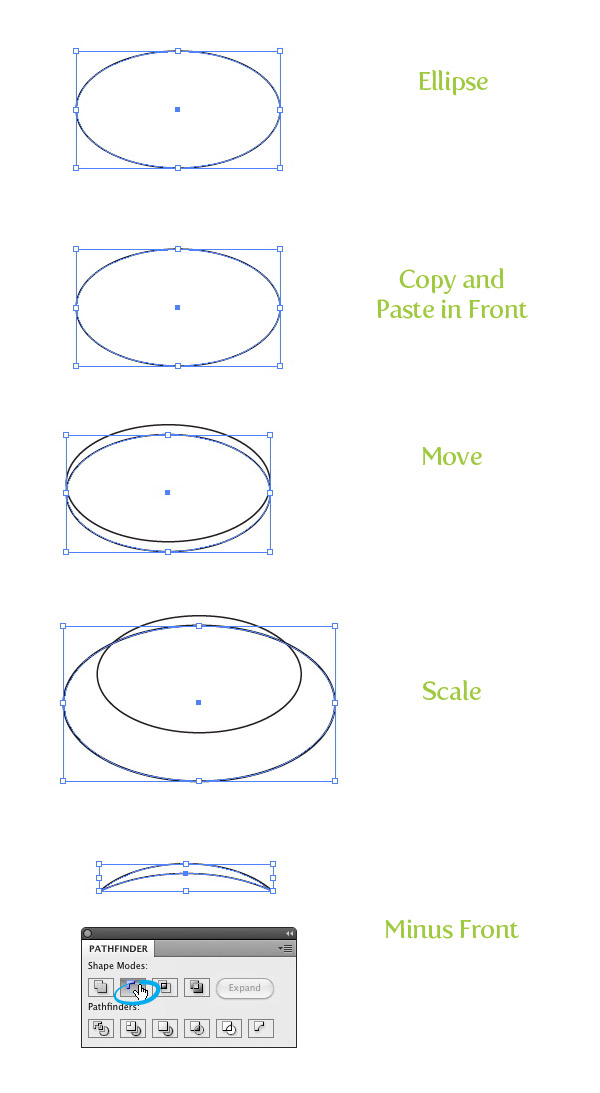
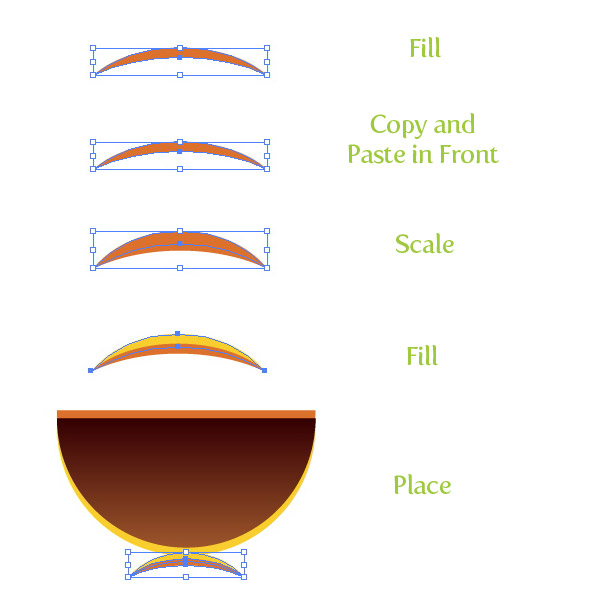
Create an oblong ellipse that is about one third the size of the mouth. Copy (Command + C) the ellipse and Paste in Front (Command + F). Move the copy down slightly and scale up about a fourth of the original size. Next, select both shapes and press the Minus Front button from the Pathfinder panel.
Step 21
Fill the new shape with your dark orange color. Copy (Command + C) the shape and Paste in Back (Command + B). Next, scale the copied shape up and change the color to your light orange color. Center both shapes on the bottom of the mouth shapes you have already created.
Step 22
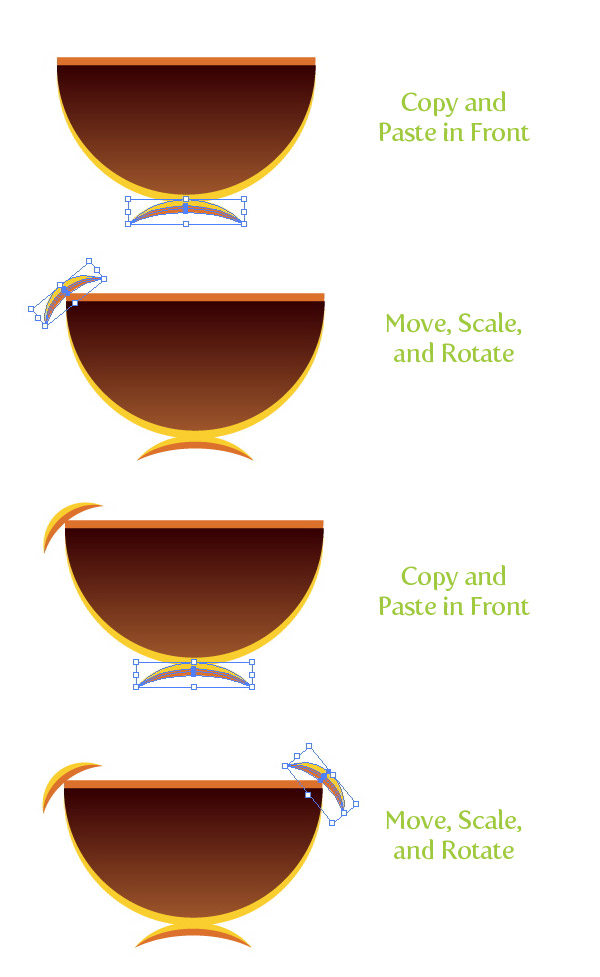
Select the newest curved shapes you created, Copy (Command + C), and Paste in Front (Command + F). Scale down and rotate the shapes to the left with the Selection tool (V), then place them on the left top side of the mouth. Next, Copy (Command + C) the original curved shapes, Paste in Front (Command + F), rotate and scale the shapes to the right, and place on the right side of the mouth shape.
Step 23
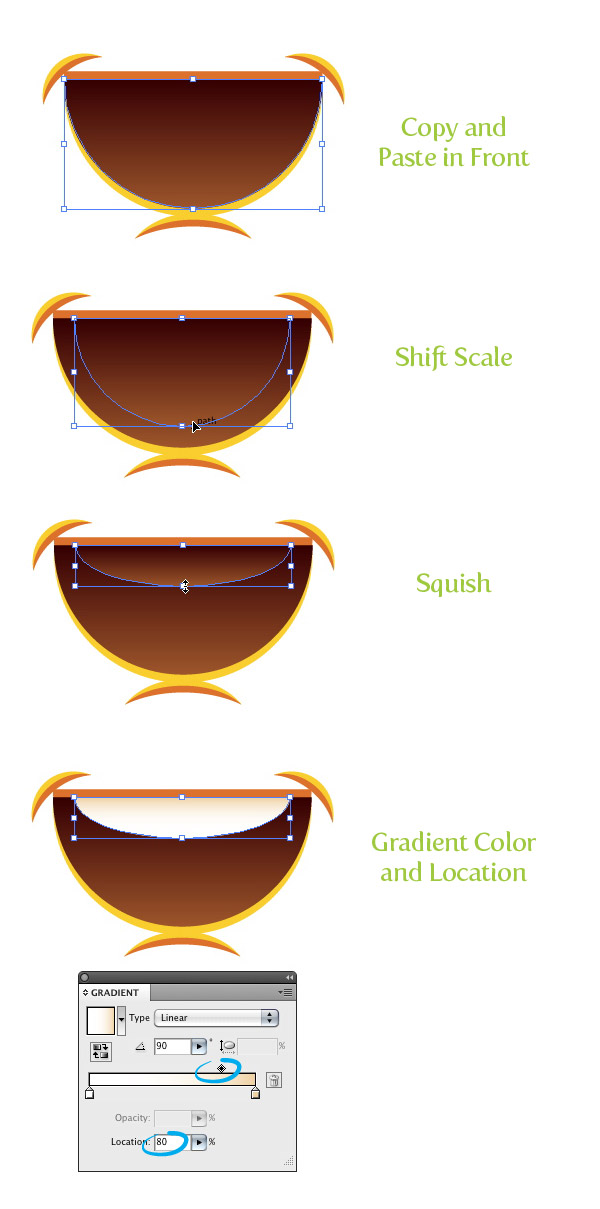
Select the main dark mouth shape, Copy (Command + C), and Paste in Front (Command + F). With the Selection tool (V), hold down the Shift key and scale the copy bottom up slightly. Still with the Selection tool (V), squish the copied shape from the bottom up until the copy is about one fourth the original size. Change the first color stop in the linear gradient to white and the second to a light orange. Also, change the Location of the Middlepoint to 80.
Step 24
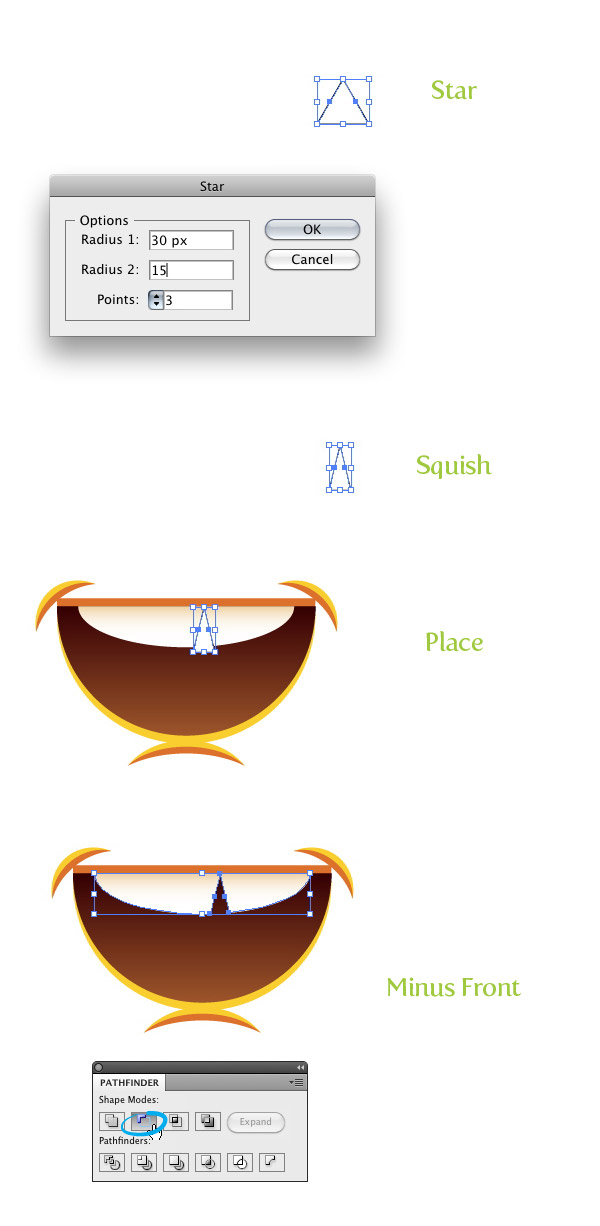
With the Star tool (found under the shape tools in the Tools panel), click on the artboard to open the Star dialog. In the dialog change Radius 1 to 30 px, Radius 2 to 15 px, and the Point to 3 (your radius dimensions might be different depending on the dimension of your artwork, just make sure that Radius 2 is half the size of Radius 1). Squish the triangle shape horizontally to about half it’s original size. Place the triangle over the center of the teeth to the right . Next, select the teeth and the triangle and press the Minus Front button from the Pathfinder panel.
Step 25
With the Ellipse tool (L) create two ellipse toward the bottom of the mouth shape, making sure half of the ellipses are hanging outside of the mouth shape. Select the main dark mouth shape, Copy (Command + C), and Paste in Front (Command + F) two times. Select one of the copies, select the right ellipse, and press the Intersect button from the Pathfinder panel. Repeat the same for the left ellipse. Fill both ellipses with a linear gradient with the first color stop a light pink and the second color stop a pink color. Separately adjust each ellipse’s gradient with the Gradient tool (G) from the top right of the ellipse to the bottom left.

Step 26
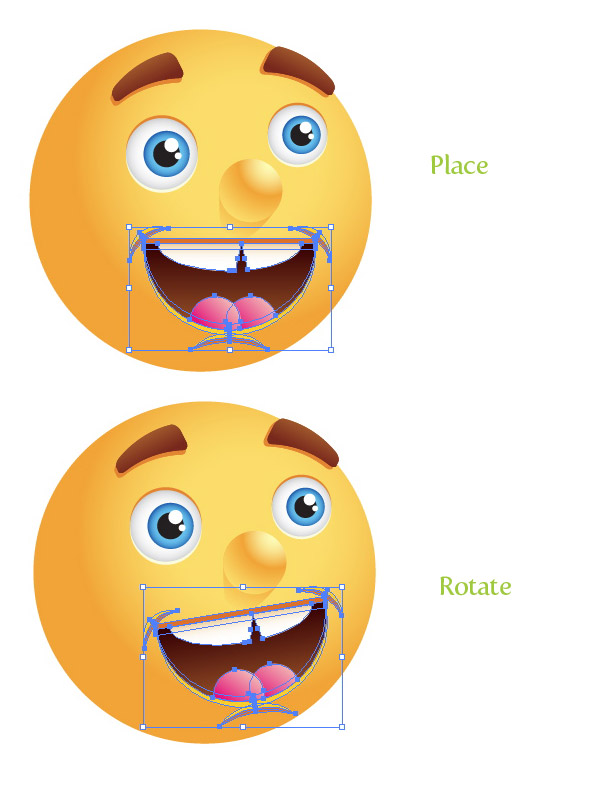
Select all the mouth shapes and place them on the sun’s face. Next, Rotate the mouth shape to the left slightly.
Step 27
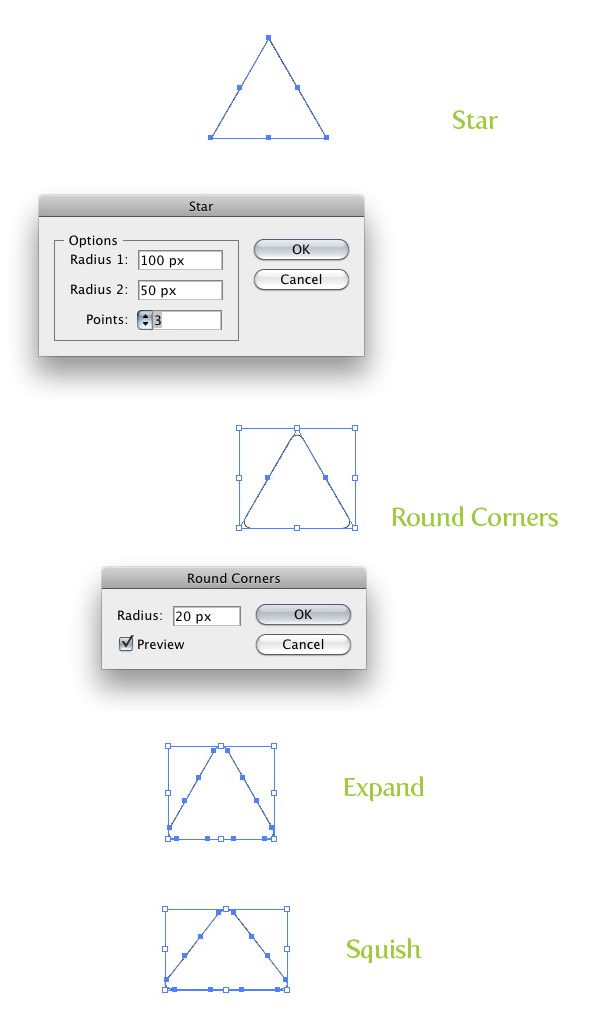
With the Star tool, click on the artboard to bring up the Star dialog. Create a star with a Radius 1 of 100 px, a Radius 2 of 50 px, and 3 Points (like before these dimensions might be different depending on your artwork). Next, go Effects > Stylize > Round Corners and in the Round Corners dialog, change to Radius to 20 px. Expand the shape and squish it down slightly with the Selection tool (V).
Step 28
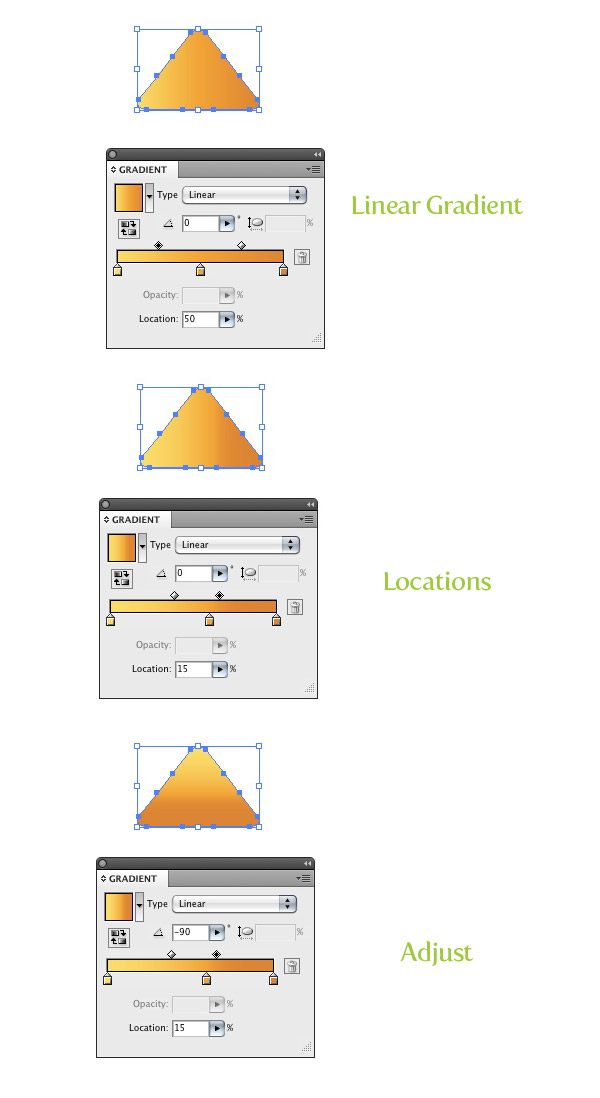
Fill the triangle with a three color stop gradient, making the first color stop a light orange color, the second a orange color, and the third a dark orange color. Select the Middlepoint in between the first two color stops in and change the Location to 65. Next, change the Location of the second color stop to 60 and the Middlepoint Location of the last two color stop to 15. Adjust the gradient from top to bottom with the Gradient tool (G).
Step 29
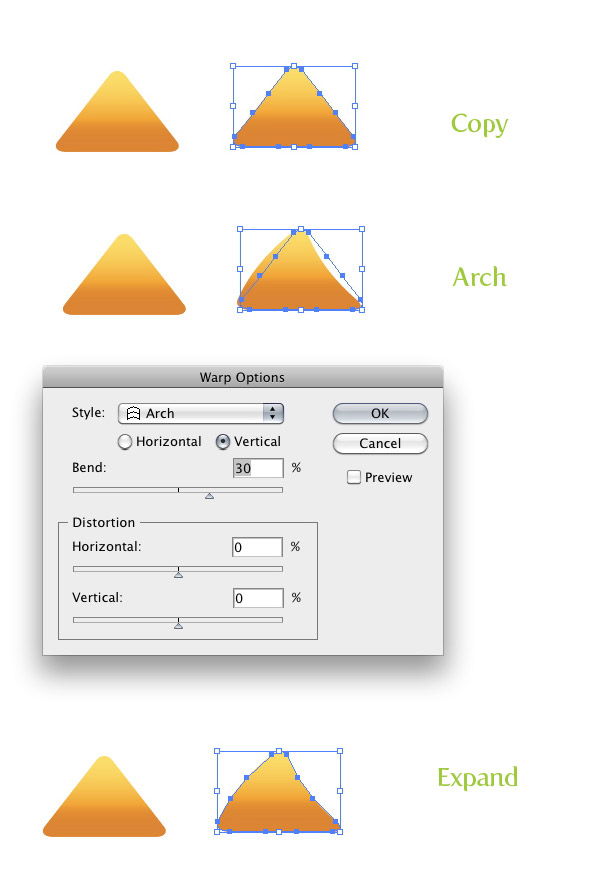
Make a copy of the triangle so you have a total of two. With the copy selected, go Effect > Warp > Arch. Within the Warp Options dialog, select the Vertical radial button and change the Bend percentage to 30 and expand the appearance.
Step 30
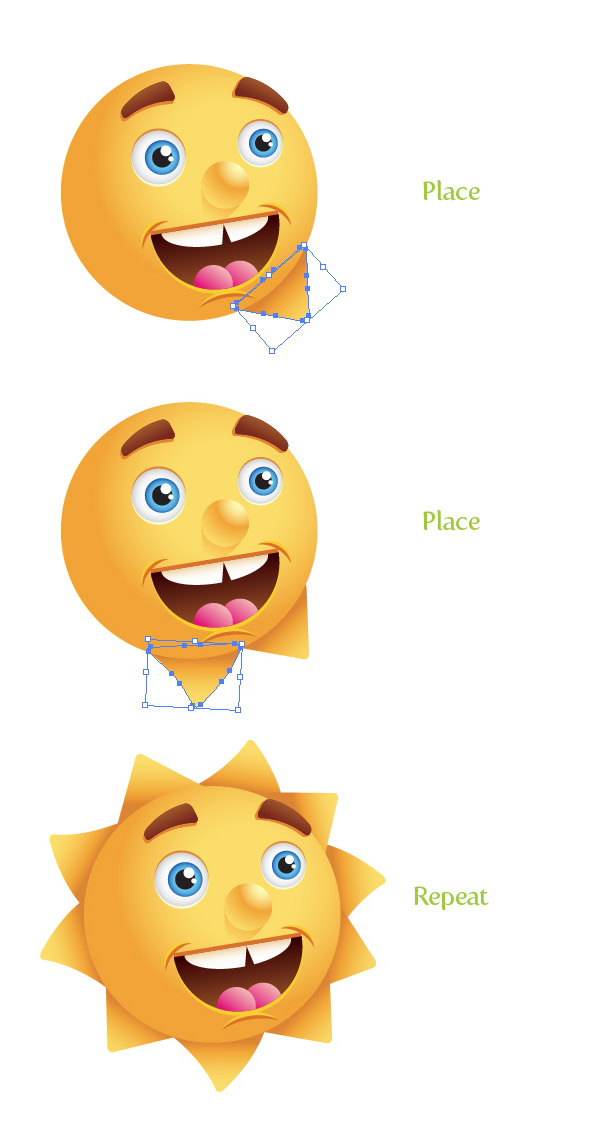
Make a copy of the first triangle, move, and rotate the copy so it radiates from the sun face shape, creating sun bursts. Make sure the triangle is behind all other artwork by going Object > Arrange > Send to Back. Next, rotate and place copies of the triangles, alternating between the two, around the sun. Make sure that all the triangles are sent to the back.
Step 31
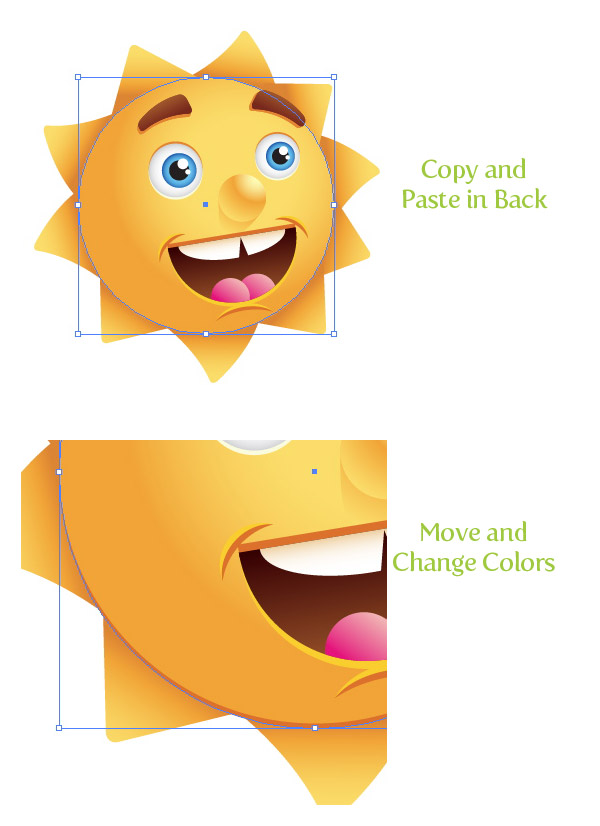
Select the main sun face shape, (Command + C), and Paste in Back (Command + B). With the copy still selected, move it down slightly and change the color to your dark orange color.
Step 32
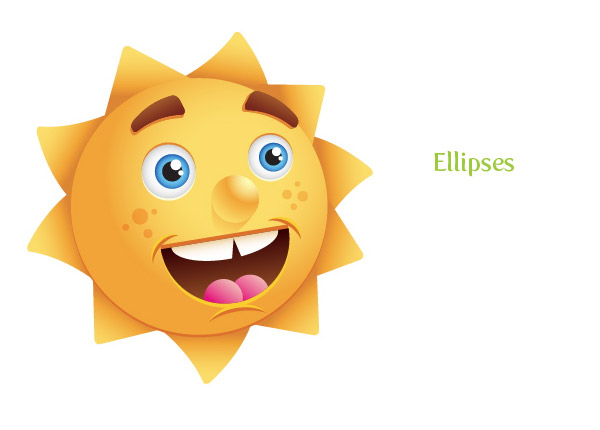
To add just a little more detail and fun to the sun, draw varying sized ellipses above the corners of the mouth. All done!
Final Image
Again below is the final image we just created.

Sample Usage
Below are some sample images of this tutorial in use. One is a logo for a fictional alternate energy learning center for kids (just made that up, but you get the point). The second one is a global warming diagram for children (not very accurate, I know). It is easy to apply this illustration to other projects or adapt it to other illustrations (like the earth illustration in the Global Warming diagram). Try to see what you can use it for!

댓글 없음:
댓글 쓰기